A few things, mostly technical notes...

Thursday, February 24, 2005

How RAM is used in Linux


Stumbled upon a very good post here, which explains why "top" or similar utils always show all your RAM being used.

mine:> free -m
total used free shared buffers cached
Mem: 91 84 7 20 21 15
-/+ buffers/cache: 47 44
Swap: 513 58 455

The -/+ buffers/cache line shows how much memory is being used and is free.
91 Meg is the RAM available after being reserved plus occupied by Kernel (which
cannot be swapped out) .

You're good if you are not swapping much. I've ~ 58 Megs of swap being used, well, it is normal with hardly 90 some Megs of RAM.

Quote from sapphirecat's original thread: " The reason Linux uses so much memory for disk cache is because the RAM is wasted if it isn't used. Keeping the cache means that if something needs the same data again, there's a good chance it will still be in the cache in memory. Fetching the information from there is around 1,000 times quicker than getting it from the hard disk. If it's not found in the cache, the hard disk needs to be read anyway, but in that case nothing has been lost in time. "

RHEL ES 4.0 release 1 -- miseries while kickstarting..

Okay, I got a DL 360 to play with, has two Broadcom cards and the installer loads tg3.ko as the drivers, and it says links is up at 100 Half.


Hmmm...

Okay, but later fails to get a dhcp response from the network.


And, throws you back at:


When you hit enter, still asking it to get response from dhcp, it cannot even find the device(?):


Alright.

Now if you assign IP addresses manually and hit enter, it will not still get onto the network:


Arrgghh..!!

Now I pop in a floppy (vfat) with a ks.cfg which has static IP details in it, and boot the box with linux ks=floppy argument...

Look what happens, it cannot even read the floppy.


Updated (03.01.2005) :

I've submitted this as bug 149682 on Feb 24 to bugzilla. Here is the link.

Tuesday, February 22, 2005

Auto-finding your hard drives for Linux Kickstart


With different hardware, the device names are to change, and thus one will have to edit the ks.cfg for Linux Kickstarts everytime you are dealing with a different hardware.

Starting with RHEL 3.0, you could include a python script in your kickstart file and derive the list of your harddrives into a file. You could later include that file to define your drives.


%pre --interpreter /usr/bin/python
import os, sys
sys.path.append('/usr/lib/anaconda')
import isys

# get a sorted list of drives
drives = isys.hardDriveDict().keys()
drives.sort()

# write the include file to /tmp/kspart, drives[0] is the first drive,
# drives[1] is the second, etc. To get the filet to be used, put
# '%include /tmp/partitions' in your kickstart configuration.
print "Writing partition details"
f = open("/tmp/partitions", "w")
f.write("part /boot --size 400 --ondisk %s\n" % drives[0])
f.write("part / --size 6144 --ondisk %s\n" % drives[0])
f.write("part swap --size 2048 --ondisk %s\n" % drives[0])
f.write("part /var --size 3072 --ondisk %s\n" % drives[0])
f.write("part /home --size 2048 --ondisk %s\n" % drives[0])
f.write("part /tmp --size 4096 --ondisk %s\n" % drives[0])
f.write("part /data --size 6144 --ondisk %s\n" % drives[0])

f.close()


Of course, add this to your kickstart file:
%include /tmp/partitions
Original posting here.


AFAIK, this does not work with RHEL 2.1, as its anaconda is still retarded. Still working on RHEL 4.0 to confirm....

Saturday, February 19, 2005

How to read Malayalam newspapers using FireFox


Most of the Malayalam newspapers use dynamic fonts. FireFox and Mozilla browsers do not support Dynamic fonts by default. Here is how you can read Malayalam and Other Indic publications using Firefox:

Option 1: Use firefox extension padma.

This works on all recent stable versions of Firefox at the time of this writing.

An advantage worth mentioning -- padma converts those pages to Unicode for you - This saves you the pain of installing individual fonts for the content you want to read. In other words, if you have an Unicode malayalam font installed already, thats all it takes...!!

A little bit about padma from the extension's page: Padma is a technology for transforming Indic text between public and proprietary formats for Mozilla based applications.

Ok, now how to get that done:

Step 1

Install Firefox's extension padma.

If you have a fairly decent Unicode font installed already, you are good to go now. Otherwise, read on:

Step 2

Download Anjali Oldlipi - perhaps the best unicode Malayalam font. Open up this url, download the latest version of AnjaliOldLipi. (At the time of this writing, 0.730 is the latest).

Copy the downloaded font file into your Fonts Directory (Settings->Crontol Panel->Fonts).

In case you are running Linux I am going to assume that you already know how to add a font.

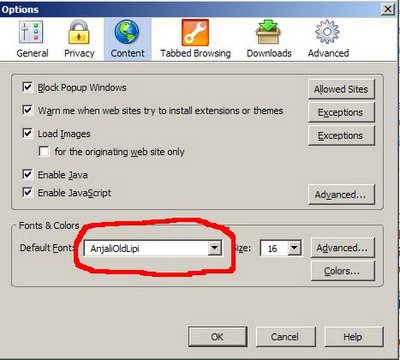
Now, fireup Firefox, Tools ->Options -> Content and set your Default Font to AnjaliOldLipi as seen in this screenshot:


That is it...!!

Enjoy browsing Malayalam publications like: Deepika, Madhyamam, Manorama, Mangalam, Mathrubhumi and more...

Oh, did I mention that you can kill all the annoying ads using AdBlock Plus?


Option 2:

Note: This is dependent on a Firefox extension "AutoCharacterEncoding" which does not seem to be in active development anymore. (Hey, developers are people too, and they move onto other things as well..!!) At the time of this writing, said extension does not work on Firefox 1.5. Another disadvantage is that, you are required to download and install the individual fonts of the malayalam publications you want to read, onto your computer.

Step 1

Download and install the fonts from the newspaper's website, unless you already have them. (Download the .ttf file, and copy it over to your Fonts directory.)

Step 2

Install AutoCharacterEncoding from mozdev.

(It merely sets the fonts for userdefined character encoding automatically.)

Step 3

Restart FireFox, and browse, saving yourself from annoying ads and popups.

Friday, February 18, 2005

How to turn on rsh and rlogin on RedHat Enterprise Linux (RHEL 2.1/ 3.0)


You have two hosts: hostA and hostB. You want to set up some sort of equivalency for user "root" on both of them.

Enable them:

Turn on these three using chkconfig on both the nodes: rexec, rsh and rlogin.


# chkconfig rexec on
# chkconfig rsh on
# chkconfig rlogin on

xinetd

Restart xinetd to be sure.

# service xinetd restart

.rhosts

On hostA's root home directory (usually /root), create a .rhosts file, which has hostB in it.

# cat .rhosts
hostB

Similarly, create a .rhosts on hostB's root home directory which has hostA in it.

# cat .rhosts
hostA

hosts.allow


Now, edit /etc/hosts.allow on hostA:


#
# hosts.allow This file describes the names of the hosts which are
# allowed to use the local INET services, as decided
# by the '/usr/sbin/tcpd' server.
#
ALL : hostB


Edit /etc/hosts.allow on hostB:

#
# hosts.allow This file describes the names of the hosts which are
# allowed to use the local INET services, as decided
# by the '/usr/sbin/tcpd' server.
#
ALL : hostA

hosts.equiv

Edit /etc/hosts.equiv on hostA to have

# cat /etc/hosts.equiv
hostB


Edit /etc/hosts.equiv on hostB to have

# cat /etc/hosts.equiv
hostA
/etc/securetty

And finally, knock off /etc/securetty (rename it or worse, purge it) on both hostA and hostB

Now you are good to go.

Disclaimer: Use at your own risk. Don't flame me. It sure worked for me. Actual results may vary. Use ssh in place of rlogin/rsh/telnet and the like, as ssh is more secure.

Thursday, February 17, 2005

Addressing IDN Spoofing on Firefox...


While debates are on, I added this "/[^\x20-\xFF]/" to my set of adblock filters. (Everything except the quotes.)

That thingy between the quotes above blocks URLs with characters outside normal ASCII range.

Editing the compreg.dat works fine until you are removing or adding a new Firefox extension, as it is recreated when Extensions are changed.

Then again, the moment you over-write your adblock filters....

You can test your browser from this page.

Tuesday, February 15, 2005

Debug flags for sendmail


Common flags:

-d0 General debugging.
-d1 Show send information.
-d2 End with finis( ).
-d3 Print the load average.
-d4 Enough disk space.
-d5 Show events.
-d6 Show failed mail.
-d7 The queue file name.
-d8 DNS name resolution.
-d9 Trace RFC1413 queries.
-d9.1 Make host name canonical.
-d10 Show recipient delivery.
-d11 Trace delivery.
-d12 Show mapping of relative host.
-d13 Show delivery.
-d14 Show header field commas.
-d15 Show network get request activity.
-d16 Outgoing connections.
-d17 List MX hosts.

-d12 Set flag 12 to level 1
-d12.3 Set flag 12 to level 3
-d3-17 Set flags 3 through 17 to level 1
-d3-17.4 Set flags 3 through 17 to level 4

More details in these following links...

Geocities, Monkeytools? , Sendmail 2nd edition, Whole scoop on configuration file

Debugging check_rcpt (Anti-Relay)

The three scenarios that should be checked out are:

1) From INT to INT
2) From EXT to INT
3) From EXT to EXT

Evoke sendmail as:

root@somelinux:> sendmail -bt -d21.4
ADDRESS TEST MODE (ruleset 3 NOT automatically invoked)

.D{client_addr}165.89.185.15
check_rcpt {email@foo.bar}


Open Relay Database is maintained here.

Project Work

A picture drawn by my brother:

Sendmail 8.11.x without DNS...


For a nullclient with DS macro enabled....

[root@haha mail]# grep service.swi /etc/sendmail.cf
# service switch file (ignored on Solaris, Ultrix, OSF/1, others)
O ServiceSwitchFile=/etc/mail/service.switch
[root@haha1 mail]# cat service.switch
hosts files
Check the /etc/host.conf to have:
order hosts
multi on

Use switch 8.8 to see it bitching about failed resolver lookups...
date |sendmail -v -d13.9 foo@foo.org

Also:

# sendmail -bt -d8.8
check_mail foo@foo.bar
/mx foo.bar
/map host foo.bar
/quit

Thursday, February 10, 2005

About kernel.sysrq

Magic SysRq is a key combination directly intercepted by the kernel and can be used, among other things, to perform an emergency shutdown. It is described in Documentation/sysrq.txt and implemented in drivers/char/sysrq.c in the kernel source tree. It exists primarily for kernel hackers, but it can be useful to people in user-space also. Since it is implemented as a part of the keyboard driver, it is guaranteed to work most of the time, unless the kernel itself is dead.

A note: In the rest of this article, when I say "SysRq key" I mean the single key beside the Scroll lock key. But when I say "magic SysRq" I mean the combination <> /proc/sys/kernel/sysrq

If you want it to be always enabled, append these lines to one of your initialization scripts(preferably rc.local).

#Enable SysRq
echo -e "Enabling SysRq\n"
echo "1" > /proc/sys/kernel/sysrq

Alternatively, you might look for a file called /etc/sysctl or /etc/sysctl.conf which some distributions have(mine, RedHat, does). You can add a line like this to it, and sysrq will be enabled at boot-time.

kernel.sysrq = 1

The magic SysRq combination is a unique one. Now, every key on the keyboard sends a code when pressed or released, called the scan-code. The magic SysRq combination (Alt+SysRq), however, sends only one scan-code(0x54, decimal 84) even though two keys have been pressed. Check this out using showkey -s.

What can I do with it ?

Magic SysRq is invoked as <> + <> sent from a remote console will be interpreted as <>, and the consequences can be disastrous. See the Remote-Serial-Console-HOWTO for more details.

Conclusion

The magic SysRq hack can come in very handy at times. However, it must be used with care. It can also give you some insights into the inner workings of the kernel. If you are enterprising, you might even hack the kernel and add new commands !

Note: The original article is here

Followers


Creative Commons License
This work is licensed under a Creative Commons License.